As a Software Developer working with containerized microservices, you’ve probably faced the challenge of deploying scalable, secure, and observable services on AWS. While ECS Fargate is a great option, wiring everything manually—ALB, IAM, CloudWatch, VPC, etc.—can be tedious.
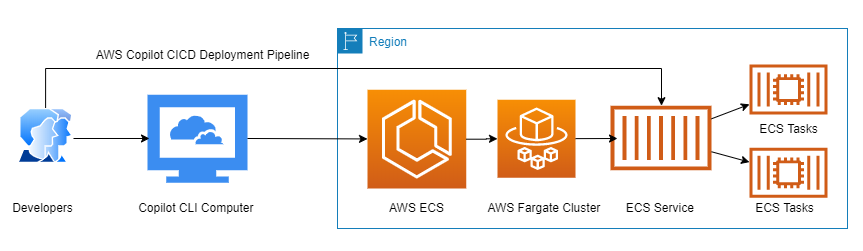
Enter AWS Copilot CLI: a developer-friendly tool that abstracts much of the complexity of ECS deployments. In this guide, we’ll walk through deploying a Load Balanced Web Service using Copilot, and show how to configure it to run inside a custom VPC—ideal for production environments where you need fine-grained control over networking.
What Is AWS Copilot CLI?
AWS Copilot CLI is a command-line tool that simplifies deploying containerized applications to Amazon ECS. It handles:
- ECS service creation
- Load balancer provisioning
- CI/CD pipeline setup
- Environment isolation
- Logging and monitoring
- Networking (including VPCs and subnets)
Copilot is opinionated but flexible—perfect for developers who want infrastructure-as-code without writing CloudFormation templates from scratch.

Prerequisites
Before we begin, make sure you have:
- ✅ AWS CLI configured (
aws configure) - ✅ AWS Copilot CLI installed (
brew install aws/tap/copilot-clior via GitHub) - ✅ Docker installed and running
- ✅ A containerized app (e.g., Golang Echo server, Node.js, Flask, etc.)
- ✅ IAM permissions to create ECS, ALB, VPC, CloudWatch, and related resources
Step 1: Initialize Your Copilot Application
Start by initializing your app:
copilot init
You’ll be prompted to:
- Choose a service type → Load Balanced Web Service
- Name your service (e.g.,
web) - Provide the Dockerfile path
- Choose a port (e.g.,
8080)
Copilot will scaffold your app and create:
- A
copilot/directory - A manifest file:
copilot/web/manifest.yml - A default environment (
test) with its own VPC, subnets, and ECS cluster
Step 2: Customize the Manifest File
Open copilot/web/manifest.yml and tweak it to suit your needs:
name: web
type: Load Balanced Web Service

image:
  build: Dockerfile

http:
  path: '/'
  healthcheck:
    path: '/health'
    grace_period: 60s

cpu: 512
memory: 1024
count:
  range:
    min: 2
    max: 5

variables:
  ENV: production
You can also configure:
- Secrets from AWS Systems Manager Parameter Store
- Sidecars (e.g., Redis, Fluent Bit)
- Autoscaling policies
- Custom domains via Route53
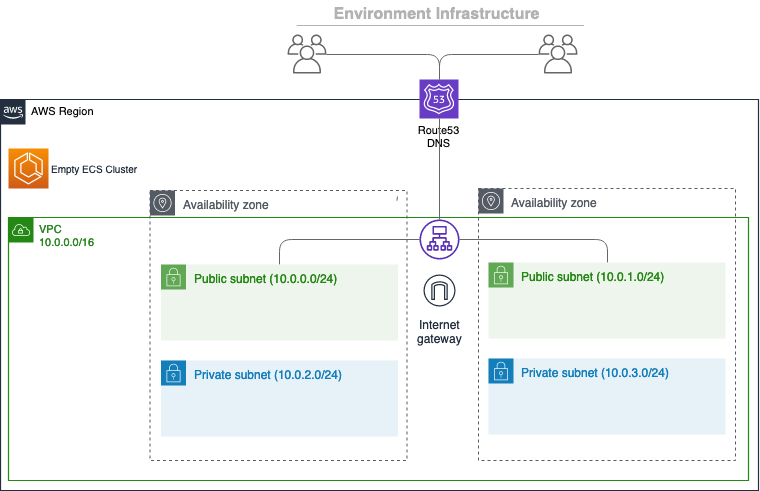
Step 3: Create a Custom VPC
By default, Copilot creates a VPC per environment. But for production, you may want to use a pre-existing VPC with:
- Public subnets (for ALB)
- Private subnets (for ECS tasks)
- NAT Gateway (for outbound internet access)
- Internet Gateway
- Route tables
You can create this VPC manually via:
- AWS Console
- AWS CloudFormation
- AWS CDK
- Terraform
Make sure to note:
- VPC ID
- Subnet IDs (public and private)
- Availability Zones
Step 4: Initialize Environment with Custom VPC
Now tell Copilot to use your custom VPC:
copilot env init --name prod --vpc-id vpc-0abc123456789def0 --subnet-ids subnet-11111111,subnet-22222222,subnet-33333333
This creates a new environment named prod inside your custom VPC. Copilot will deploy ECS services, ALB, and other resources into this VPC.
? Note: Copilot expects at least two subnets in different AZs for high availability.
Step 5: Deploy Your Service

Deploy your service to the prod environment:
copilot deploy --name web --env prod
Copilot will:
- Build and push your Docker image to ECR
- Create an ECS Fargate service
- Provision an Application Load Balancer
- Configure CloudWatch logs
- Set up IAM roles and security groups
Step 6: Verify Deployment
Check the status of your service:
copilot svc show --name web --env prod
You’ll see:
- Load balancer URL
- Task count and status
- CPU/memory usage
- Logs and metrics
You can also tail logs:
copilot svc logs --name web --env prod
Step 7: Test Your Service
Visit the load balancer URL Copilot provides. You should see your app running!
If you configured a health check path (/health), you can verify that the ALB is routing traffic correctly.
Step 8: Clean Up Resources
To delete everything:
copilot app delete
This removes:
- ECS services
- ALB
- CloudWatch logs
- IAM roles
- (Optionally) VPC if it was created by Copilot
If you used a custom VPC, it will remain intact.
Bonus: Add Monitoring and CI/CD
Copilot supports:
- CloudWatch dashboards for metrics
- AWS CodePipeline for CI/CD (
copilot pipeline init) - Custom domains via Route53 (
copilot svc deploy --domain example.com)
You can also integrate with external tools like Datadog, Prometheus, or Grafana by adding sidecars or exporting metrics.
Final Thoughts
AWS Copilot CLI is a game-changer for developers deploying containerized apps to ECS. It abstracts away the complexity of infrastructure while giving you the flexibility to customize networking, scaling, and observability.
Using a custom VPC ensures your services are deployed in a secure, production-ready environment with full control over routing, NAT, and subnet isolation.